Linux Server
Filesystem
Expanding an existing filesystem using LVM
Description
This example below shows you how to expand an existing filesystem that it managed by Logical Volume Manager (LVM)
Examine the existing filesystem
This command will to the host to rescan the host adapters after a new disk has been added.
echo "- - -" | tee /sys/class/scsi_host/host*/scan
/dev/mapper/ubuntu--vg-ubuntu--lv is the filesystem I want to expand.
root@dock-host-2:/mnt# df -lh
Filesystem Size Used Avail Use% Mounted on
tmpfs 1.6G 1.7M 1.6G 1% /run
/dev/mapper/ubuntu--vg-ubuntu--lv 63G 17G 43G 28% /
tmpfs 7.9G 0 7.9G 0% /dev/shm
tmpfs 5.0M 0 5.0M 0% /run/lock
/dev/sda2 974M 163M 745M 18% /boot
tmpfs 1.6G 4.0K 1.6G 1% /run/user/1000
Use lsblk to take a look at all devices available. In my example I am going to use /dev/sdb as the disk to expand the existing filesystem in the LVM. lsblk shows that is /dev/sdb is 128GB in size.
root@dock-host-2:~# lsblk
NAME MAJ:MIN RM SIZE RO TYPE MOUNTPOINT
loop0 7:0 0 55.5M 1 loop /snap/core18/2344
loop1 7:1 0 55.5M 1 loop /snap/core18/2409
loop2 7:2 0 118.4M 1 loop /snap/docker/1779
loop3 7:3 0 61.9M 1 loop /snap/core20/1494
loop4 7:4 0 102.4M 1 loop /snap/lxd/23243
loop5 7:5 0 61.9M 1 loop /snap/core20/1518
loop6 7:6 0 117.2M 1 loop /snap/docker/1767
loop7 7:7 0 47M 1 loop /snap/snapd/16292
loop8 7:8 0 47M 1 loop /snap/snapd/16010
loop10 7:10 0 102.4M 1 loop /snap/lxd/23270
sda 8:0 0 128G 0 disk
├─sda1 8:1 0 1M 0 part
├─sda2 8:2 0 1G 0 part /boot
└─sda3 8:3 0 127G 0 part
└─ubuntu--vg-ubuntu--lv 253:0 0 63.5G 0 lvm /
sdb 8:16 0 128G 0 disk
sr0 11:0 1 1024M 0 rom
The next step is to run a command to prep the new disk for the LVM format.
root@dock-host-2:~# pvcreate /dev/sdb
WARNING: dos signature detected on /dev/sdb at offset 510. Wipe it? [y/n]: y
Wiping dos signature on /dev/sdb.
Physical volume "/dev/sdb" successfully created.
Once the disk is ready we need to identify the the LVM name and use it to extend the volume with the new disk we set up.
root@dock-host-2:~# vgs
VG #PV #LV #SN Attr VSize VFree
ubuntu-vg 1 1 0 wz--n- <127.00g 63.50g
Once we know the name of the Volume Group we can expand the Volume Group with the new disk.
root@dock-host-2:~# vgextend ubuntu-vg /dev/sdb
Volume group "ubuntu-vg" successfully extended
After the Volume Group has been extended we can run some commands to verify the new size. You can see in the example below that we have more space in our Volume Group.
root@dock-host-2:~# vgs
VG #PV #LV #SN Attr VSize VFree
ubuntu-vg 2 1 0 wz--n- 254.99g <191.50groot@dock-host-2:~# vgdisplay
--- Volume group ---
VG Name ubuntu-vg
System ID
Format lvm2
Metadata Areas 2
Metadata Sequence No 3
VG Access read/write
VG Status resizable
MAX LV 0
Cur LV 1
Open LV 1
Max PV 0
Cur PV 2
Act PV 2
VG Size 254.99 GiB
PE Size 4.00 MiB
Total PE 65278
Alloc PE / Size 16255 / <63.50 GiB
Free PE / Size 49023 / <191.50 GiB
VG UUID CVE1jf-w4fj-FreW-Xn1p-i3gv-gzbh-GcpJdY
Now that the Volume Group is expanded we need to expand the Logical Volume and expand the Filesystem to use the new disk space. The commands below are used to check on the Logical Volume and then extend the Logical Volume.
root@dock-host-2:~# lvdisplay
--- Logical volume ---
LV Path /dev/ubuntu-vg/ubuntu-lv
LV Name ubuntu-lv
VG Name ubuntu-vg
LV UUID K5CEFt-q6tF-cjxB-wCFh-f970-CTy9-07KYYk
LV Write Access read/write
LV Creation host, time ubuntu-server, 2021-12-19 20:48:29 +0000
LV Status available
# open 1
LV Size <63.50 GiB
Current LE 16255
Segments 1
Allocation inherit
Read ahead sectors auto
- currently set to 256
Block device 253:0
root@dock-host-2:~# lvextend -l +100%FREE /dev/ubuntu-vg/ubuntu-lv
Size of logical volume ubuntu-vg/ubuntu-lv changed from <63.50 GiB (16255 extents) to 254.99 GiB (65278 extents).
Logical volume ubuntu-vg/ubuntu-lv successfully resized.
The last step is the expand the filesystem and verify that there is more free space.
root@dock-host-2:~# resize2fs /dev/mapper/ubuntu--vg-ubuntu--lv
resize2fs 1.46.3 (27-Jul-2021)
Filesystem at /dev/mapper/ubuntu--vg-ubuntu--lv is mounted on /; on-line resizing required
old_desc_blocks = 8, new_desc_blocks = 32
The filesystem on /dev/mapper/ubuntu--vg-ubuntu--lv is now 66844672 (4k) blocks long.
root@dock-host-2:~# df -lh
Filesystem Size Used Avail Use% Mounted on
tmpfs 1.6G 1.7M 1.6G 1% /run
/dev/mapper/ubuntu--vg-ubuntu--lv 251G 17G 224G 7% /
tmpfs 7.9G 0 7.9G 0% /dev/shm
tmpfs 5.0M 0 5.0M 0% /run/lock
/dev/sda2 974M 163M 745M 18% /boot
tmpfs 1.6G 4.0K 1.6G 1% /run/user/1000
Docker
Create a MAC VLAN network
Description
The command below is an example of creating a layer 2 macvlan network in docker. In the example below, the network I am using is 10.128.140.0/24 on interface ens160. You will have to replace the subnet and interface according to your install.
Conifguration
docker network create -d macvlan --subnet=10.128.140.0/24 --gateway 10.128.140.1 -o parent=ens160 L2-Connect
and this is how you add a VLAN network
docker network create -d macvlan --subnet=172.16.8.0/22 --gateway 172.16.8.1 -o parent=ens192.40 Data-40-L2-Connect
After creation of the network you can take a look to make sure it exists
root@container:~# docker network ls
NETWORK ID NAME DRIVER SCOPE
01734d37ed78 L2-Connect macvlan local
310563fabcd7 bridge bridge local
4bc024cbd7cc host host local
d2879a267450 none null local
Deploy Portainer on a MAC VLAN network
Description
On the previous page I showed how to create a layer 2 macvlan network that allows you to deploye containers in the same network as the host itself. This example will show you how to deploye Portainer CE using the layer 2 macvlan network we created.
Configuration
root@container:~# docker run -d --network L2-Connect --ip=10.128.140.31 --dns=1.1.1.1 --name=Portainer --restart=always -v /var/run/docker.sock:/var/run/docker.sock -v portainer_data:/data portainer/portainer-ce:latest
Once the container has been created you can run the docker container ls command to see the deployed container.
root@container:~# docker container ls
CONTAINER ID IMAGE COMMAND CREATED STATUS PORTS NAMES
cd30907cabe6 portainer/portainer-ce:latest "/portainer" 10 minutes ago Up 10 minutes Portainer
Networking
Modifying the netplan to add interfaces and VLANs
Below is an example of the default netplan file to add an aditional unnumberd interface.
root@docker-app-1:~# cat /etc/netplan/00-installer-config.yaml
# This is the network config written by 'subiquity'
network:
ethernets:
ens160:
addresses:
- 10.128.50.10/24
nameservers:
addresses:
- 1.1.1.1
- 1.0.0.1
search: []
routes:
- to: default
via: 10.128.50.1
ens192: {}
version: 2
Below is an example of the default netplan file to add an aditional unnumberd interface with an attached unnumbered VLAN.
network:
ethernets:
ens160:
addresses:
- 10.128.50.10/24
nameservers:
addresses:
- 1.1.1.1
- 1.0.0.1
search: []
routes:
- to: default
via: 10.128.50.1
ens192: {}
version: 2vlans:
vlan40:
id: 40
link: ens192
Certificates
Signing Public Certificates using OpenSSL
Creating a Private Key and Certificate Signing Request (CSR)
Use the following OpenSSL command to generate a Private Key and a Certificate Signing Request for signing a public certificate against a public Certificate Authority
openssl req -newkey rsa:2048 -keyout login-hpnlab-net.key -out login-hpnlab-net.csr
Let's break down what this command is doing.
- The green text option tells OpenSSL that we're making a request.
- The yellow text options tell OpenSSL to create a private key.
- The red text options tell OpenSSL to create a Certificate Signing Request and use the information from our private key
OpenSSL will need some additional information to finish creating the Certificate Signing Request. The green text is the information filled out to finish creating the Certificate Signing Request. The red text is where we provide a password to encrypt the Private Key, make sure it's secure and keep it close by as we'll need it later.
~/certificates/login.hpnlab.net$ openssl req -newkey rsa:2048 -keyout login-hpnlab-net.key -out login-hpnlab-net.csr
.+++++++++++++++++++++++++++++++++++++++++++++++++++++++++++++++++*....+....+++++++++++++++++++++++++++++++++++++++++++++++++++++++++++++++++*.......................+...+.........+.....+....+...........+...............+++++++++++++++++++++++++++++++++++++++++++++++++++++++++++++++++
..........+......+....+...+...+............+.....+................+..............+...+....+...+...+..+.+...........+.+..+.+....................+.+...+..+....+.....+......+++++++++++++++++++++++++++++++++++++++++++++++++++++++++++++++++*...............+...+.+++++++++++++++++++++++++++++++++++++++++++++++++++++++++++++++++*...+....+++++++++++++++++++++++++++++++++++++++++++++++++++++++++++++++++
Enter PEM pass phrase: <enter a secret password here>
Verifying - Enter PEM pass phrase: <re-type your secret password here>
-----
You are about to be asked to enter information that will be incorporated
into your certificate request.
What you are about to enter is what is called a Distinguished Name or a DN.
There are quite a few fields but you can leave some blank
For some fields there will be a default value,
If you enter '.', the field will be left blank.
-----
Country Name (2 letter code) [AU]:US
State or Province Name (full name) [Some-State]:North Dakota
Locality Name (eg, city) []:West Fargo
Organization Name (eg, company) [Internet Widgits Pty Ltd]:HPN Lab
Organizational Unit Name (eg, section) []:
Common Name (e.g. server FQDN or YOUR name) []:login.hpnlab.net
Email Address []:Please enter the following 'extra' attributes
to be sent with your certificate request
A challenge password []:
An optional company name []:
Once the command has finished running we'll be left with two files, the Private Key and the Certificate Signing Request
~/certificates/login.hpnlab.net$ ls -lh
total 8.0K
-rw-rw-r-- 1 tyler tyler 1001 Sep 11 09:02 login-hpnlab-net.csr
-rw------- 1 tyler tyler 1.9K Sep 11 09:01 login-hpnlab-net.key
The next step is to copy the contents of the Certificate Signing Request and submit it to a public Certificate Authority for signing. The highlighted text is what gets submitted for signing.
~/certificates/login.hpnlab.net$ cat login-hpnlab-net.csr
-----BEGIN CERTIFICATE REQUEST-----
MIICqzCCAZMCAQAwZjELMAkGA1UEBhMCVVMxFTATBgNVBAgMDE5vcnRoIERha290
YTETMBEGA1UEBwwKV2VzdCBGYXJnbzEQMA4GA1UECgwHSFBOIExhYjEZMBcGA1UE
AwwQbG9naW4uaHBubGFiLm5ldDCCASIwDQYJKoZIhvcNAQEBBQADggEPADCCAQoC
ggEBANLFOtCCMm+YFMUWu2NICNLqXKbotbnU0XwJ+NTXqw+9TxYU4tPIXPKXVWGQ
0tfZwYz+bOrfa2HhLUy3c9J9eX2ccyUoVBU7QBhVWSyvuShCkuZ2D4aqth/s0zxi
nHgCP8wTC5x5W2sK3orrRfCPxohL62l66DXRxh9eX5hSiTZ5+SqOMQdhr7f4alFP
KtJfiBehcH+KBE2BGbS61G0Ij9B6TEZ8OB8oHXC6EA3AkScsbSaj0+yy5DBCV9mj
mwfIpYExVpTfbsos5MaT0QfQLcu0eysh2D1mg74Jyq0yfdZkR8q64kKDsQChGuAt
0RfXFqeUv0xHienJlnTRDuhNM/cCAwEAAaAAMA0GCSqGSIb3DQEBCwUAA4IBAQAp
drJJ4eclrfQz1WXofLfCCaRcpdhe/+SytpQmb77DRMTHQrXXCMCrHplgNusZr7rA
z38A50mFIq/4jqT74R6kyZsXkKPCHMY1hXyKKdZWMT76tPLIFgKnI1e/b+IH45f3
NnN7wN6AMQFaaTLyBKGUr5nnCU5kU5LsvmhHUkf4jJJl5gcfI4d9QV7MYBHsZw7J
XrOZ7bx3mwSz3w8Z5sl1+tqzEzOfdTwFCGLQeHBEEHCnffIJM63wdJ/NnaBRfocC
weawU/sh67uQoW0YKGRAGihNC24er9+8qQ/MPWBubogEt/z0KTsSE7sGRwZUQgVs
G/t6rbRn6MDL7Zwu5Qzc
-----END CERTIFICATE REQUEST-----
Submit a Certificate Signing Request to a public Certificate Authority for Signing
Once the Certificate has been purchased from a public signer, the next step is to sign the Certificate. The example below shows the Certificate Signing Request submission process using GoDaddy.
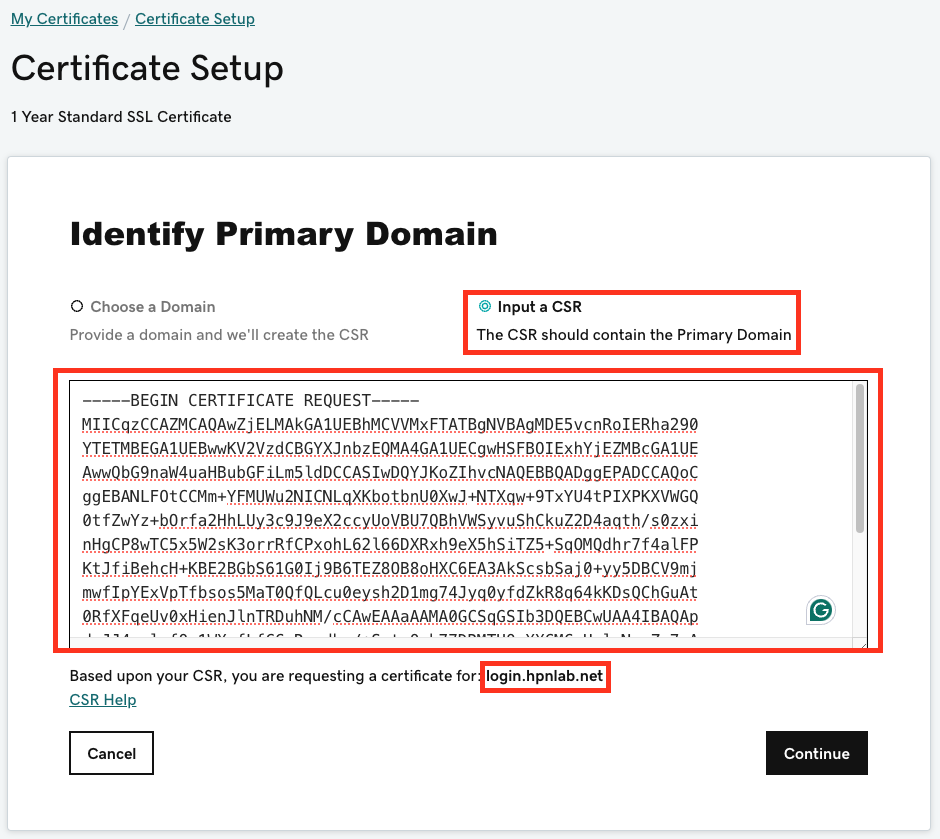
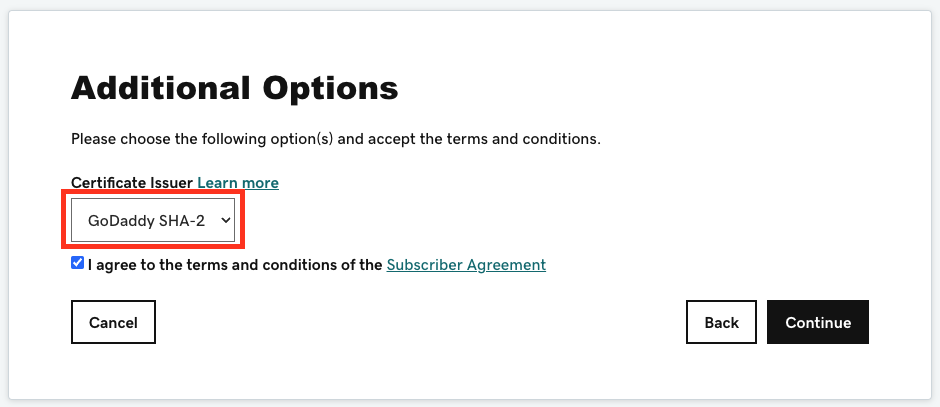
If you're using GoDaddy, it's recommended to use the GoDaddy SHA-2 Issuing CA in the screenshot below.
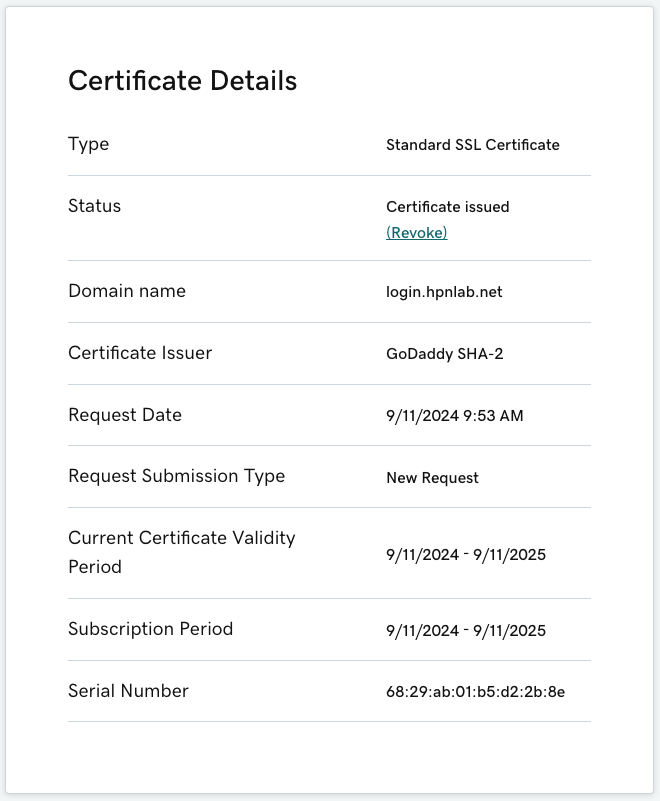
Once the Certificate Signing Request has been submitted to GoDaddy, there might be some verification steps to go through before the certificate is signed. After the certificate has been issued you should see a status page that looks similar to the below screenshot.
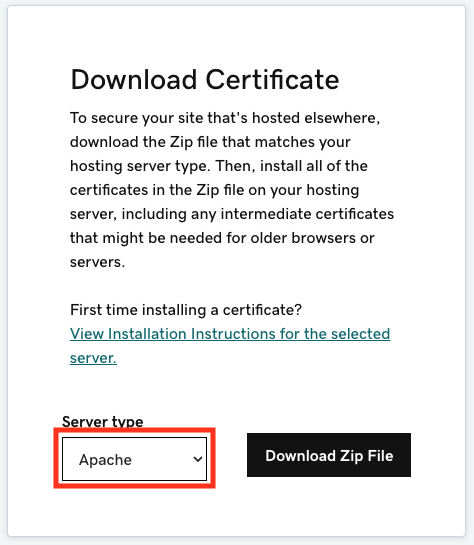
Next, download the certificate in a text (base64) format. In the example below I picked Apache knowing that the certificate will be encoded in text (base64) format. The zip file will contain the certificate and the Issuing Certificate Authority trust chain.
Extracting and Converting the certificates to different formats for different uses
Once the certificate Zip file has been downloaded, extract the Zip file contents to the same directory where you have your Private Key and Certificate Signing Request. In the example below I rename the signed certificate to be more in line with my filename convention.
~/certificates/login.hpnlab.net$ unzip login.hpnlab.net.zip
Archive: login.hpnlab.net.zip
inflating: gd_bundle-g2-g1.crt
inflating: 6829ab01b5d22b8e.crt
inflating: 6829ab01b5d22b8e.pem
~/certificates/login.hpnlab.net$ mv 6829ab01b5d22b8e.crt login-hpnlab-net.crt
~/certificates/login.hpnlab.net$ ls -lh
total 32K
-rw-rw-r-- 1 tyler tyler 2.3K Sep 11 07:57 6829ab01b5d22b8e.pem
-rw-rw-r-- 1 tyler tyler 4.7K Sep 11 07:57 gd_bundle-g2-g1.crt
-rw-rw-r-- 1 tyler tyler 2.3K Sep 11 07:57 login-hpnlab-net.crt
-rw-rw-r-- 1 tyler tyler 1001 Sep 11 09:02 login-hpnlab-net.csr
-rw------- 1 tyler tyler 1.9K Sep 11 09:01 login-hpnlab-net.key
-rw-rw-r-- 1 tyler tyler 6.6K Sep 11 10:41 login.hpnlab.net.zip
Create a PFX (PKCS12) secure keychain
Use the OpenSSL command below to read the certificate files and encode them into a PFX file.
~/certificates/login.hpnlab.net$ openssl pkcs12 -export -out login-hpnlab-net.pfx -inkey login-hpnlab-net.key -in login-hpnlab-net.crt -certfile gd_bundle-g2-g1.crt
Let's break down what this command is doing
- The green text options tell OpenSSL we want to create a PFX (PKCS12) file.
- The yellow text options tell OpenSSL to read and import the Private Key into the PFX file.
- The red text options tell OpenSSL to read and import the signed certificate.
- The orange text options tell OpenSSL to read and import the Certificate Authority trust chain.
Once the command is executed you'll need to enter the password for the Private Key that we created earlier and you'll need to provide a new password to protect the PFX file. You can see that we now have a PFX file.
Enter pass phrase for login-hpnlab-net.key: <password for private key>
Enter Export Password: <new password for pfx file>
Verifying - Enter Export Password: <verify new password for pfx file>
tyler@dock-host-1:~/certificates/login.hpnlab.net$ ls -lh
total 40K
-rw-rw-r-- 1 tyler tyler 2.3K Sep 11 07:57 6829ab01b5d22b8e.pem
-rw-rw-r-- 1 tyler tyler 4.7K Sep 11 07:57 gd_bundle-g2-g1.crt
-rw-rw-r-- 1 tyler tyler 2.3K Sep 11 07:57 login-hpnlab-net.crt
-rw-rw-r-- 1 tyler tyler 1001 Sep 11 09:02 login-hpnlab-net.csr
-rw------- 1 tyler tyler 1.9K Sep 11 09:01 login-hpnlab-net.key
-rw------- 1 tyler tyler 6.9K Sep 11 11:06 login-hpnlab-net.pfx
-rw-rw-r-- 1 tyler tyler 6.6K Sep 11 10:41 login.hpnlab.net.zip