# Certificates
# Signing Public Certificates using OpenSSL
#### Creating a Private Key and Certificate Signing Request (CSR)
Use the following OpenSSL command to generate a Private Key and a Certificate Signing Request for signing a public certificate against a public Certificate Authority
> openssl req -newkey rsa:2048 -keyout login-hpnlab-net.key -out login-hpnlab-net.csr
Let's break down what this command is doing.
- The green text option tells OpenSSL that we're making a request.
- The yellow text options tell OpenSSL to create a private key.
- The red text options tell OpenSSL to create a Certificate Signing Request and use the information from our private key
OpenSSL will need some additional information to finish creating the Certificate Signing Request. The green text is the information filled out to finish creating the Certificate Signing Request. The red text is where we provide a password to encrypt the Private Key, make sure it's secure and keep it close by as we'll need it later.
> ~/certificates/login.hpnlab.net$ openssl req -newkey rsa:2048 -keyout login-hpnlab-net.key -out login-hpnlab-net.csr
> .+++++++++++++++++++++++++++++++++++++++++++++++++++++++++++++++++\*....+....++++++++++++++++
>
> +++++++++++++++++++++++++++++++++++++++++++++++++\*.......................+...+.........+.....+....+...........+...............+++++++++++++++++++++++++++++++++++++++++++++++++++++++++++++++++
> ..........+......+....+...+...+............+.....+................+..............+...+....+...+...+..+.+...........+.+..+.+....................+.+...+..+....+.....+......+++++++++++++++++++++++++++++++++++++++++++++++++++++++++++++++++\*...............+...+.+++++++++++++++++++++++++++++++++++++++++++++++++++++++++++++++++\*...+....+++++++++++++++++++++++++++++++++++++++++++++++++++++++++++++++++
> Enter PEM pass phrase: <enter a secret password here>
> Verifying - Enter PEM pass phrase: <re-type your secret password here>
> \-----
> You are about to be asked to enter information that will be incorporated
> into your certificate request.
> What you are about to enter is what is called a Distinguished Name or a DN.
> There are quite a few fields but you can leave some blank
> For some fields there will be a default value,
> If you enter '.', the field will be left blank.
> \-----
> Country Name (2 letter code) \[AU\]:US
> State or Province Name (full name) \[Some-State\]:North Dakota
> Locality Name (eg, city) \[\]:West Fargo
> Organization Name (eg, company) \[Internet Widgits Pty Ltd\]:HPN Lab
> Organizational Unit Name (eg, section) \[\]:
> Common Name (e.g. server FQDN or YOUR name) \[\]:login.hpnlab.net
> Email Address \[\]:
>
> Please enter the following 'extra' attributes
> to be sent with your certificate request
> A challenge password \[\]:
> An optional company name \[\]:
Once the command has finished running we'll be left with two files, the Private Key and the Certificate Signing Request
> ~/certificates/login.hpnlab.net$ ls -lh
> total 8.0K
> -rw-rw-r-- 1 tyler tyler 1001 Sep 11 09:02 login-hpnlab-net.csr
> -rw------- 1 tyler tyler 1.9K Sep 11 09:01 login-hpnlab-net.key
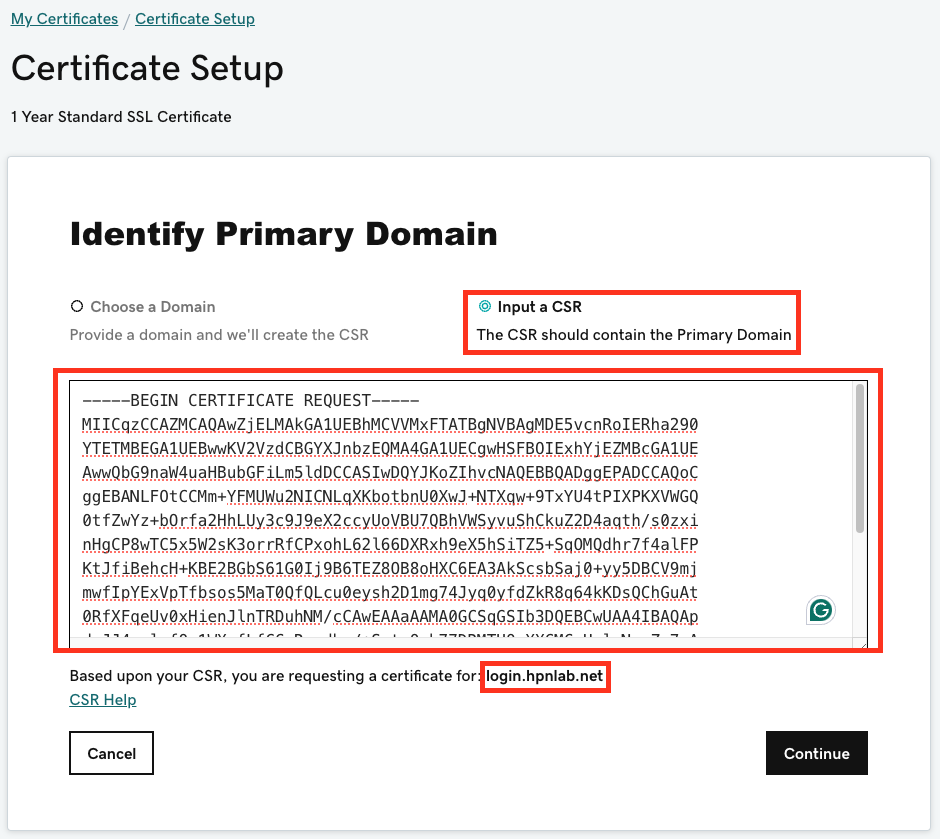
The next step is to copy the contents of the Certificate Signing Request and submit it to a public Certificate Authority for signing. The highlighted text is what gets submitted for signing.
> ~/certificates/login.hpnlab.net$ cat login-hpnlab-net.csr
> -----BEGIN CERTIFICATE REQUEST-----
> MIICqzCCAZMCAQAwZjELMAkGA1UEBhMCVVMxFTATBgNVBAgMDE5vcnRoIERha290
> YTETMBEGA1UEBwwKV2VzdCBGYXJnbzEQMA4GA1UECgwHSFBOIExhYjEZMBcGA1UE
> AwwQbG9naW4uaHBubGFiLm5ldDCCASIwDQYJKoZIhvcNAQEBBQADggEPADCCAQoC
> ggEBANLFOtCCMm+YFMUWu2NICNLqXKbotbnU0XwJ+NTXqw+9TxYU4tPIXPKXVWGQ
> 0tfZwYz+bOrfa2HhLUy3c9J9eX2ccyUoVBU7QBhVWSyvuShCkuZ2D4aqth/s0zxi
> nHgCP8wTC5x5W2sK3orrRfCPxohL62l66DXRxh9eX5hSiTZ5+SqOMQdhr7f4alFP
> KtJfiBehcH+KBE2BGbS61G0Ij9B6TEZ8OB8oHXC6EA3AkScsbSaj0+yy5DBCV9mj
> mwfIpYExVpTfbsos5MaT0QfQLcu0eysh2D1mg74Jyq0yfdZkR8q64kKDsQChGuAt
> 0RfXFqeUv0xHienJlnTRDuhNM/cCAwEAAaAAMA0GCSqGSIb3DQEBCwUAA4IBAQAp
> drJJ4eclrfQz1WXofLfCCaRcpdhe/+SytpQmb77DRMTHQrXXCMCrHplgNusZr7rA
> z38A50mFIq/4jqT74R6kyZsXkKPCHMY1hXyKKdZWMT76tPLIFgKnI1e/b+IH45f3
> NnN7wN6AMQFaaTLyBKGUr5nnCU5kU5LsvmhHUkf4jJJl5gcfI4d9QV7MYBHsZw7J
> XrOZ7bx3mwSz3w8Z5sl1+tqzEzOfdTwFCGLQeHBEEHCnffIJM63wdJ/NnaBRfocC
> weawU/sh67uQoW0YKGRAGihNC24er9+8qQ/MPWBubogEt/z0KTsSE7sGRwZUQgVs
> G/t6rbRn6MDL7Zwu5Qzc
> -----END CERTIFICATE REQUEST-----
#### Submit a Certificate Signing Request to a public Certificate Authority for Signing
Once the Certificate has been purchased from a public signer, the next step is to sign the Certificate. The example below shows the Certificate Signing Request submission process using GoDaddy.
[](https://books.designlogic.net/uploads/images/gallery/2024-09/screenshot-2024-09-11-at-9-26-52-am.png)
If you're using GoDaddy, it's recommended to use the GoDaddy SHA-2 Issuing CA in the screenshot below.
[](https://books.designlogic.net/uploads/images/gallery/2024-09/screenshot-2024-09-11-at-9-53-00-am.png)
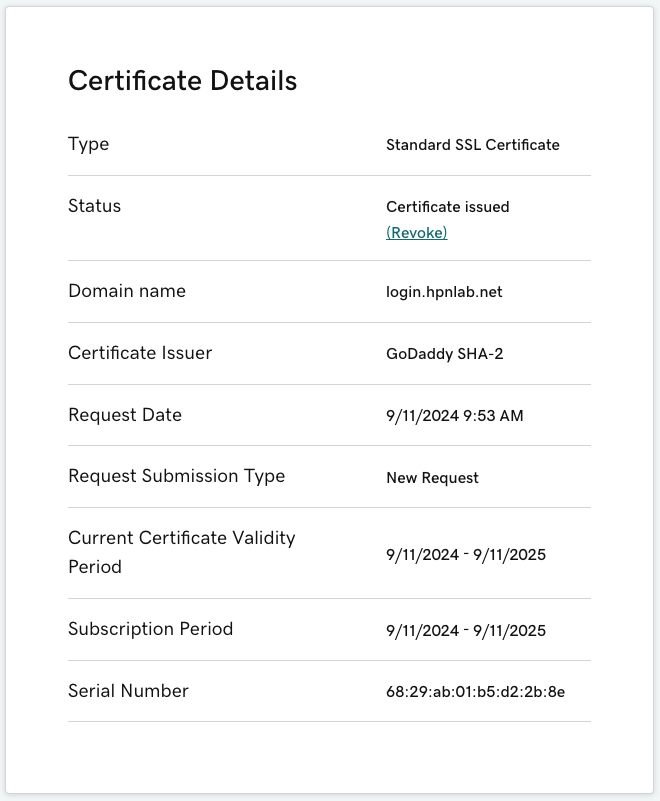
Once the Certificate Signing Request has been submitted to GoDaddy, there might be some verification steps to go through before the certificate is signed. After the certificate has been issued you should see a status page that looks similar to the below screenshot.
[](https://books.designlogic.net/uploads/images/gallery/2024-09/screenshot-2024-09-11-at-9-57-04-am.png)
Next, download the certificate in a text (base64) format. In the example below I picked Apache knowing that the certificate will be encoded in text (base64) format. The zip file will contain the certificate and the Issuing Certificate Authority trust chain.
[](https://books.designlogic.net/uploads/images/gallery/2024-09/screenshot-2024-09-11-at-9-57-20-am-2.png)
#### Extracting and Converting the certificates to different formats for different uses
Once the certificate Zip file has been downloaded, extract the Zip file contents to the same directory where you have your Private Key and Certificate Signing Request. In the example below I rename the signed certificate to be more in line with my filename convention.
> ~/certificates/login.hpnlab.net$ unzip login.hpnlab.net.zip
> Archive: login.hpnlab.net.zip
> inflating: gd\_bundle-g2-g1.crt
> inflating: 6829ab01b5d22b8e.crt
> inflating: 6829ab01b5d22b8e.pem
> ~/certificates/login.hpnlab.net$ mv 6829ab01b5d22b8e.crt login-hpnlab-net.crt
> ~/certificates/login.hpnlab.net$ ls -lh
> total 32K
> -rw-rw-r-- 1 tyler tyler 2.3K Sep 11 07:57 6829ab01b5d22b8e.pem
> -rw-rw-r-- 1 tyler tyler 4.7K Sep 11 07:57 gd\_bundle-g2-g1.crt
> -rw-rw-r-- 1 tyler tyler 2.3K Sep 11 07:57 login-hpnlab-net.crt
> -rw-rw-r-- 1 tyler tyler 1001 Sep 11 09:02 login-hpnlab-net.csr
> -rw------- 1 tyler tyler 1.9K Sep 11 09:01 login-hpnlab-net.key
> -rw-rw-r-- 1 tyler tyler 6.6K Sep 11 10:41 login.hpnlab.net.zip
##### Create a PFX (PKCS12) secure keychain
Use the OpenSSL command below to read the certificate files and encode them into a PFX file.
> ~/certificates/login.hpnlab.net$ openssl pkcs12 -export -out login-hpnlab-net.pfx -inkey login-hpnlab-net.key -in login-hpnlab-net.crt -certfile gd\_bundle-g2-g1.crt
Let's break down what this command is doing
- The green text options tell OpenSSL we want to create a PFX (PKCS12) file.
- The yellow text options tell OpenSSL to read and import the Private Key into the PFX file.
- The red text options tell OpenSSL to read and import the signed certificate.
- The orange text options tell OpenSSL to read and import the Certificate Authority trust chain.
Once the command is executed you'll need to enter the password for the Private Key that we created earlier and you'll need to provide a new password to protect the PFX file. You can see that we now have a PFX file.
> Enter pass phrase for login-hpnlab-net.key: <password for private key>
> Enter Export Password: <new password for pfx file>
> Verifying - Enter Export Password: <verify new password for pfx file>
> tyler@dock-host-1:~/certificates/login.hpnlab.net$ ls -lh
> total 40K
> -rw-rw-r-- 1 tyler tyler 2.3K Sep 11 07:57 6829ab01b5d22b8e.pem
> -rw-rw-r-- 1 tyler tyler 4.7K Sep 11 07:57 gd\_bundle-g2-g1.crt
> -rw-rw-r-- 1 tyler tyler 2.3K Sep 11 07:57 login-hpnlab-net.crt
> -rw-rw-r-- 1 tyler tyler 1001 Sep 11 09:02 login-hpnlab-net.csr
> -rw------- 1 tyler tyler 1.9K Sep 11 09:01 login-hpnlab-net.key
> -rw------- 1 tyler tyler 6.9K Sep 11 11:06 login-hpnlab-net.pfx
> -rw-rw-r-- 1 tyler tyler 6.6K Sep 11 10:41 login.hpnlab.net.zip